Sqlite for Xamarin made easy
Let’s see how we can add a Sqlite database to your Xamarin projects in an incredibly easy way.
To help you to speed up your Xamarin development, I?ve created a set of plugins, one of them is MTSQL. Thanks to this plugin you can add a Sqlite database with a single line of code. The plugin is built on top of the Sqlite-net plugin by Frank A. Krueger.
A couple of useful link you can find useful:
Nuget link:https://www.nuget.org/packages/MarcTron.SQL
Project website:http://www.xamarinexpert.it/plugins/mt-sql/
To report any issue:https://bitbucket.org/marcojak81/mtsql
And now let?s see how to integrate the plugin inside your Xamarin Forms solution.
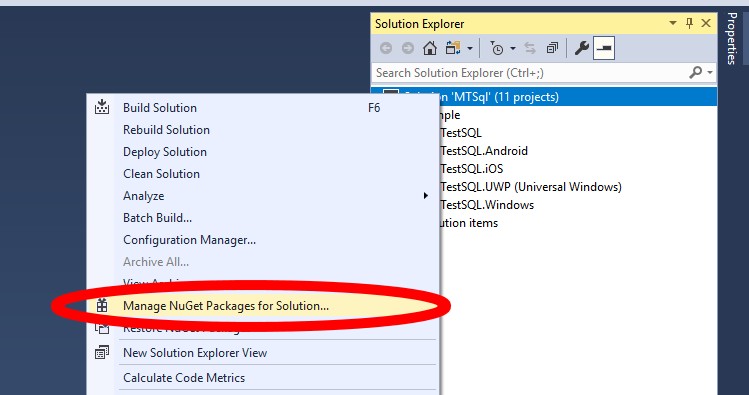
First of all we need to install the plugin. To do that, do a right-click on your solution and click on Manage NuGet Packages for Solution
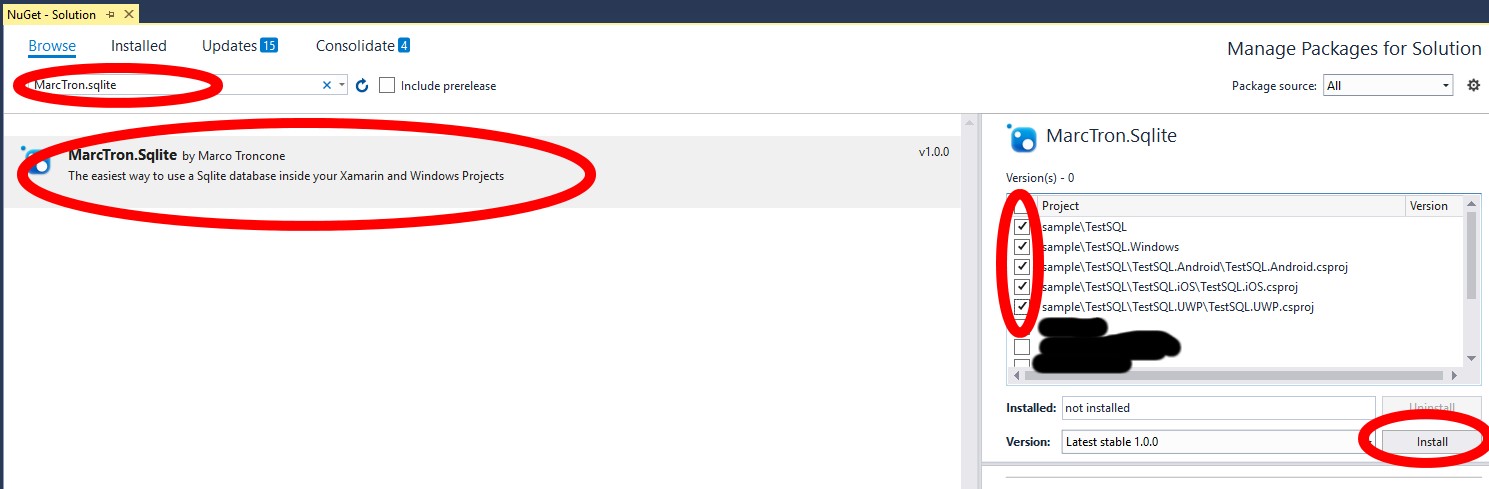
Now search the package MarcTron.Sqlite, click on it and remember to select all your projects (.Net Standard project + all the main application projects) then click Install.
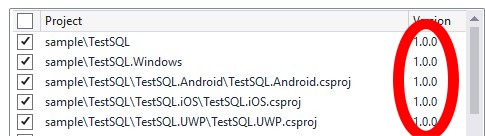
The Plugin will take care to install for you also the Sqlite-net plugin byFrank A. Krueger.
If everything worked as expected, you will see the version of the plugin next to each of the projects you have selected in the previous step.
Now it’s time to try the plugin to see how easy it is.
Inside the MainPage constructor you can see that the only line of code you need to create your database and open a connection to it is
SQLiteConnection conn = MTSql.Current.GetConnection("YOURDBNAME.db3");Remember to replace the string with the name you want for your database.
using MarcTron.Plugin.MTSql;
using SQLite;
using Xamarin.Forms;
namespace YOURNAMESPACE
{
public partial class MainPage : ContentPage
{
class TestTable
{
[PrimaryKey, AutoIncrement]
public int Id { get; set; }
public string name { get; set; }
public TestTable()
{
}
public TestTable(string name)
{
this.name = name;
}
}
public MainPage()
{
InitializeComponent(); //The only line you need to create your database.
SQLiteConnection conn = MTSql.Current.GetConnection("YOURDBNAME.db3");
//This in case you want to use an async connection
//SQLiteAsyncConnection connAsync = MTSql.Current.GetConnectionAsync();
//This is just for test...
//Create the table TestTable
conn.CreateTable<TestTable>();
//Insert some elements
conn.Insert(new TestTable("A"));
conn.Insert(new TestTable("B"));
conn.Insert(new TestTable("C"));
//Verify that the elements are there
Label1.Text = "Rows:" + conn.Table<TestTable>().Count();
}
}
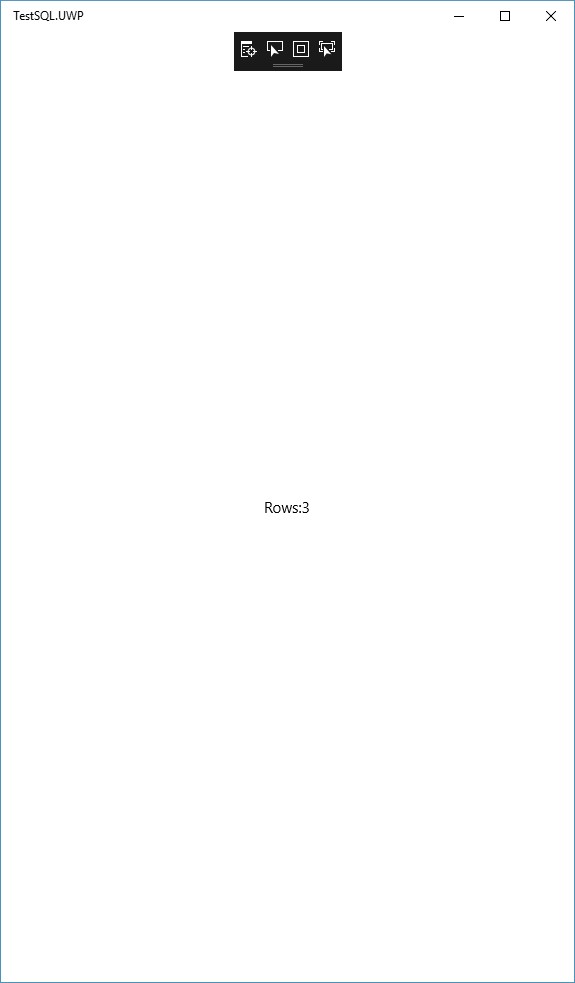
}As you can see in the image after we obtain a connection to the database, we can create a table and add some elements to it. Just for test I have added 3 items. If everything works as expected we should see inside the text “Rows:3” on screen. And this is exactly what we get launching the app on UWP.
So, thanks to this plugin, you have your Sqlite database inside your app with only 1 line of code.
What do you think? Add your comment at the end of the page.
October 7, 2020 @ 8:13 am
Hi Marco,
Just a quick question
How would I store an object as Blob?
Also, I have a complex object that has ExpandoObject in it. Could you please help me with storing and retrieving it?
July 15, 2020 @ 2:02 am
I’m getting an Cannot implicitly convert type ‘string’ to ‘System.IO.Stream
I know i’m missing something this is my code:
var myDatabase = MtSql.Current.GetDatabaseAsStream();
Stream dest = Environment.GetFolderPath(Environment.SpecialFolder.MyDocuments);
myDatabase.CopyTo(dest);
July 11, 2020 @ 9:11 pm
Hi Maverick,
You should something like:
var yourDbStream = MtSql.Current.GetDatabaseAsStream();
yourDbStream .CopyTo(yourDestinationStream);
July 10, 2020 @ 11:47 pm
Why can’t I just get the Stream of my database and do a File.Copy(myDatabaseStream, destination)
I keep getting a can not convert from System.IO.Stream to string
October 14, 2019 @ 4:28 am
Hola Marcos
Soy nuevo en xamarÃn y querÃa saber cómo leer, actualizar y editar datos en la tabla si tenés un ejemplo como el que sale acá de insertar.
Desde ya muchas gracias.
July 6, 2019 @ 12:07 am
Hi Marco
Im getting the following error when trying to add the NuGet Package…Unable to get repository signature information for source https://api.nuget.org/v3-index/repository-signatures/5.0.0/index.json. … appreciate some help…many thanks, alwyn
July 8, 2019 @ 11:35 am
Hi Alwyn,
For what I’ve read online the problem is not related to the plugin but to nuget. I’ve read that a Visual Studio restart should solve the issue.
Let me know if it worked!
Cheers,
Marco
June 16, 2019 @ 1:02 am
Would this work with prebuilt databases with multiple tables (made with DB browser for SQLite?) And if so what would the code look like? I have the database in the assets folder in android and the resources folder in iOs project. If you could provide your insight as to how to implement the plugin with this particulr circumstance I would be so so grateful!!
June 16, 2019 @ 1:22 pm
Hi JOanna,
It’s possible to use my plugin with a prebuilt database. The only thing to notice is that this plugin saves (and loads) the database from the “Environment.SpecialFolder.Personal” folder which should be
something similar to: /data/data/@PACKAGE_NAME@/files.
It means that you should copy your existing db from the assets folder to that folder and after that, you can easily use the plugin.
As this database could be incompatible (I doubt it but of course I cannot be sure),I’d suggest you to do a backup of it before you try to use it with the plugin.
It’s IMPORTANT to notice that you MUST create in your code the SAME models already present in your database).
I’m doing some test to confirm it and asap I’ll update you about this.
In the next few days I’m going to release a new version of the plugin that will make ever easier to work with it, I’ll see if I manage to add also an option to load/use/save the database directly from the Assets folder.
Marco
March 20, 2019 @ 1:56 am
Would you be able to give me a little help on where i would start to get the data base up on google drive. So far i have MtSql.Current.GetDatabaseAsStream(“testDB.db3”);
Do i store this in a variable or maybe some how move it to a folder i can get to and upload it manually?
March 20, 2019 @ 11:03 am
You can write something like this:
Stream yourDatabaseStream = MtSql.Current.GetDatabaseAsStream(“testDB.db3â€);
Now basically you have a Stream of your file and you can decide to do with this stream whatever you want (put on OneDrive, Google Drive, share on Whatsapp…).
It’s just up to you.
For Google Drive you can use their API, this is the link: https://developers.google.com/drive/api/v3/manage-uploads
The have an example on that page:
request = driveService.Files.Create(fileMetadata, stream, “image/jpeg”);
request.Fields = “id”;
request.Upload();
What you have to do here is to pass your stream and change the file type.
I hope it helps
Marco
March 20, 2019 @ 12:48 am
You’re welcome, Thank you for helping me !
March 18, 2019 @ 1:39 am
could you help with a way to back up the data base and upload it google drive etc..
March 19, 2019 @ 11:23 am
Hi Maverik.
I think I can add a method to retrieve the database file, then you can easily upload it on google drive. I’ll try to release a new version of the plugin today.
EDIT: I’ve uploaded the new version 1.1.1 on Nuget. There is now a method GetDatabaseAsStream(string dbname) that you can use to get a Stream of your database.
Then you can use the stream as you prefer.
Thank you for your comment. You helped me to improve the plugin
January 4, 2019 @ 3:09 pm
Hi,
Thank you for your lovely code. It just makes life so much easier!
But, I have heard I need to save the database inside a different folder on iOS otherwise Apple will reject the app. Is that true?
If so, could you please advise how I can specify the database path when creating the connection?
Thanks!
January 4, 2019 @ 3:25 pm
Hi Amir. Thank you for your message. Currently the database path is “SpecialFolder.Personal”. Because the folder belongs to your app, you are allowed to put what you want inside and Apple will not reject the app (I’ve published many apps with this code and Apple was happy about that). I’ll try to update the plugin this weekend so that it will be possible to select a preferred path. Anyway I suggest you to continue to use this path for security reasons.
January 4, 2019 @ 4:43 pm
Thank you very much Marco for prompt response and again for your amazing plugin.
Wouldn’t it be nice to have it published to GitHub as well?
It’s just so amazing that I can’t image how I have lived without it for so long!