Let’s see how we can add a Sqlite database to your Xamarin projects in an incredibly easy way.
To help you to speed up your Xamarin development, I?ve created a set of plugins, one of them is MTSQL. Thanks to this plugin you can add a Sqlite database with a single line of code. The plugin is built on top of the Sqlite-net plugin by Frank A. Krueger.
And now let?s see how to integrate the plugin inside your Xamarin Forms solution.
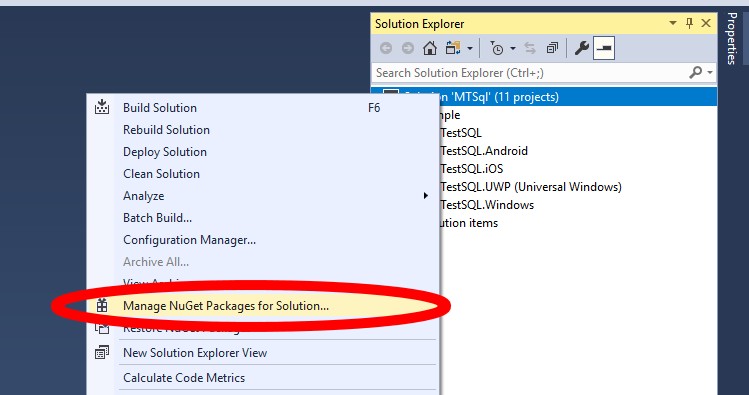
First of all we need to install the plugin. To do that, do a right-click on your solution and click on Manage NuGet Packages for Solution
Now search the package MarcTron.Sqlite, click on it and remember to select all your projects (.Net Standard project + all the main application projects) then click Install.
The Plugin will take care to install for you also the Sqlite-net plugin byFrank A. Krueger.
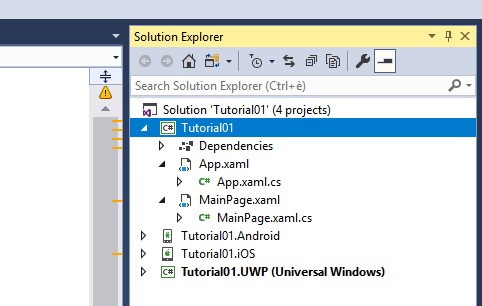
If everything worked as expected, you will see the version of the plugin next to each of the projects you have selected in the previous step.
Now it’s time to try the plugin to see how easy it is.
Inside the MainPage constructor you can see that the only line of code you need to create your database and open a connection to it is
Remember to replace the string with the name you want for your database.
using MarcTron.Plugin.MTSql;
using SQLite;
using Xamarin.Forms;
namespace YOURNAMESPACE
{
public partial class MainPage : ContentPage
{
class TestTable
{
[PrimaryKey, AutoIncrement]
public int Id { get; set; }
public string name { get; set; }
public TestTable()
{
}
public TestTable(string name)
{
this.name = name;
}
}
public MainPage()
{
InitializeComponent(); //The only line you need to create your database.
SQLiteConnection conn = MTSql.Current.GetConnection("YOURDBNAME.db3");
//This in case you want to use an async connection
//SQLiteAsyncConnection connAsync = MTSql.Current.GetConnectionAsync();
//This is just for test...
//Create the table TestTable
conn.CreateTable<TestTable>();
//Insert some elements
conn.Insert(new TestTable("A"));
conn.Insert(new TestTable("B"));
conn.Insert(new TestTable("C"));
//Verify that the elements are there
Label1.Text = "Rows:" + conn.Table<TestTable>().Count();
}
}
}
As you can see in the image after we obtain a connection to the database, we can create a table and add some elements to it. Just for test I have added 3 items. If everything works as expected we should see inside the text “Rows:3” on screen. And this is exactly what we get launching the app on UWP.
So, thanks to this plugin, you have your Sqlite database inside your app with only 1 line of code.
What do you think? Add your comment at the end of the page.
Xamarin.Forms is fantastic, you write your code once inside your PCL/.NetStandard project and it will run on many different platforms.However sometimes we need to access directly the native platform. To do so, we can use something called DependencyService.DependencyService allows us to use platform-specific functionality from shared code.To use the DependencyService we need:
An interface inside our shared code
An implementation for each platform
A registration
After the DependencyService is ready, then we can call it from our shared code.If we want to add a Sqlite database to our Xamarin.Forms project, because we cannot create it directly in our shared code, we need to use a DependencyService so in this tutorial we are going to see how to use the DependencyService to create and use a Sqlite database in our multi platform app.
In the first image you can see the structure of a Xamarin.Forms project.As we said, the creation of a DependencyService consists of 3 steps.
First Step – The interface
Now the first step to do, is to create the Interface for our DependencyService.Let’s create and add an interface called ISql to our .NetStandard project:
This interface exposes two methods:GetConnection: Get a connection for the Sqlite database.GetConnectionAsync: Get an async connection for the Sqlite database.Really easy. Don’t you think?
Second Step – The implementation
Inside this second step, we need to implement the interface in each platform. Let’s start with Android
Android
We need to create in Android a class the implements the ISql interface, let’s call this class SqlImplementation:
public class SqlImplementation : ISql
{
public SQLiteConnection GetConnection(string dbname = "database.db3")
{
var sqliteFilename = dbname;
string documentsPath = System.Environment.GetFolderPath(Environment.SpecialFolder.Personal);
// Documents folder
var path = Path.Combine(documentsPath, sqliteFilename);
var conn = new SQLiteConnection(path, SQLiteOpenFlags.ReadWrite | SQLiteOpenFlags.Create | SQLiteOpenFlags.FullMutex);
return conn;
}
public SQLiteAsyncConnection GetConnectionAsync(string dbname = "database.db3")
{
var sqliteFilename = dbname;
string documentsPath = System.Environment.GetFolderPath(Environment.SpecialFolder.Personal); // Documents folder
var path = Path.Combine(documentsPath, sqliteFilename);
return new SQLiteAsyncConnection(path);
}
}
We have basically implemented the two methods of our ISql interface. These two methods return the native connection to an Android Sqlite database.
iOS
Now we need to create the same class inside the native iOS project:
public class SqlImplementation : ISql
{
public SQLiteConnection GetConnection(string dbname = "database.db3")
{
var sqliteFilename = dbname;
string documentsPath = Environment.GetFolderPath(Environment.SpecialFolder.Personal); // Documents folder
var path = Path.Combine(documentsPath, sqliteFilename);
var conn = new SQLiteConnection(path, SQLiteOpenFlags.ReadWrite | SQLiteOpenFlags.Create | SQLiteOpenFlags.FullMutex);
return conn;
}
public SQLiteAsyncConnection GetConnectionAsync(string dbname = "database.db3")
{
var sqliteFilename = dbname;
string documentsPath = Environment.GetFolderPath(Environment.SpecialFolder.Personal); // Documents folder
var path = Path.Combine(documentsPath, sqliteFilename);
return new SQLiteAsyncConnection(path);
}
}
As you can see the code is basically the same but it’s IMPORTANT to add the implementation to each platform you need to use, otherwise you’ll get an error.
UWP
Now it’s time to implement the interface for UWP:
public class SqlImplementation : ISql
{
public SQLiteConnection GetConnection(string dbname = "database.db3")
{
var sqliteFilename = dbname;
var path = Path.Combine(ApplicationData.Current.LocalFolder.Path, sqliteFilename);
var conn = new SQLiteConnection(path, SQLiteOpenFlags.ReadWrite | SQLiteOpenFlags.Create | SQLiteOpenFlags.FullMutex);
return conn;
}
public SQLiteAsyncConnection GetConnectionAsync(string dbname = "database.db3")
{
var sqliteFilename = dbname;
var path = Path.Combine(ApplicationData.Current.LocalFolder.Path, sqliteFilename);
return new SQLiteAsyncConnection(path);
}
}
and this concludes the second step.
Third Step – The registration
it’s extremely important to register the DependencyService otherwise it will not work.Don’t worry, this step is incredibly easy, the only thing you need to do is to add this line of code in each SqlImplementation class just before the namespace:
[assembly: Dependency(typeof(SqlImplementation))]
so for example the final code of your Android implementation will be:
[assembly: Dependency(typeof(SqlImplementation))]
namespace YOURNAMESPACE
{
public class SqlImplementation : ISql
{
public SQLiteConnection GetConnection(string dbname = "database.db3")
{
var sqliteFilename = dbname;
string documentsPath = System.Environment.GetFolderPath(Environment.SpecialFolder.Personal); // Documents folder
var path = Path.Combine(documentsPath, sqliteFilename);
var conn = new SQLiteConnection(path, SQLiteOpenFlags.ReadWrite | SQLiteOpenFlags.Create | SQLiteOpenFlags.FullMutex);
return conn;
}
public SQLiteAsyncConnection GetConnectionAsync(string dbname = "database.db3")
{
var sqliteFilename = dbname;
string documentsPath = System.Environment.GetFolderPath(Environment.SpecialFolder.Personal); // Documents folder
var path = Path.Combine(documentsPath, sqliteFilename);
return new SQLiteAsyncConnection(path);
}
}
}
REMEMBER to add the assembly line to EACH of your SqlImplementation classes.
HOW TO USE IT
Now the DependencyService is ready, we just need to call use it. If we want to get the SqLite connection we just need to use a single line of code inside our share code:
Now you have your sql connection in you shared code so you can start to use your SqLite database.
Sqlite Plugin
It’s extremely easy to use the DependencyService to add a Sqlite database to your Xamarin.Forms app, but if you want an already made solution, you can use my Sqlite plugin so after you install it, you can directly use your database with a single line of code:
We use cookies to ensure that we give you the best experience on our website. If you continue to use this site we will assume that you are happy with it.Ok