How to add a Checkbox in Xamarin.Forms
We are going to show step by step how to create a Checkbox for Xamarin.Forms with a very simple code without the use of Custom Renderers.This checkbox will work on every platform: Android, iOS, UWP… and the final result will be something like:


There are just two steps you need to do:
- Add your images
- Create the Checkbox class
After the two steps, I’m going to show you a small example on how to use this checkbox.
Add the Checkbox images
The first thing to do is to choose two images for the checkbox, one enabled and the other disabled (similat to the ones you can see in the previous images).
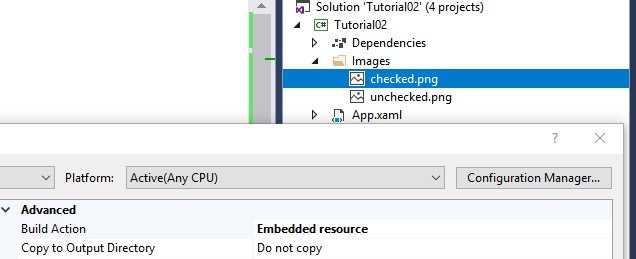
Create an Images folder inside your PCL/.NetStandard project and add the two images in it. Be sure to set the two images as Embedded Resources (as in the previous image).
Add the Checkbox class
Now it’s time to create our checkbox class. Inside your PCL/.NetStandard project create the file Checkbox:
using System;
using System.Windows.Input;
using Xamarin.Forms;

namespace Tutorial02
{
    public class Checkbox : StackLayout
    {
        public event EventHandler CheckedChanged;
        private readonly Image _image;

        private readonly Label _label;
        //CHANGE THESE 2 STRINGS ACCORDING TO YOUR NAMESPACE AND IMAGE

        static string imgUnchecked = "Tutorial02.Images.unchecked.png";
        static string imgChecked = "Tutorial02.Images.checked.png";
        public static readonly BindableProperty CommandProperty = BindableProperty.Create("Command", typeof(ICommand), typeof(Checkbox));

        public static readonly BindableProperty CheckedProperty = BindableProperty.Create("Checked", typeof(Boolean?), typeof(Checkbox), null,
            BindingMode.TwoWay, propertyChanged: CheckedValueChanged);

        public static readonly BindableProperty TextProperty =
            BindableProperty.Create("Text", typeof(String), typeof(Checkbox), null, BindingMode.TwoWay, propertyChanged: TextValueChanged);

        public ICommand Command
        {
            get => (ICommand) GetValue(CommandProperty);
            set => SetValue(CommandProperty, value);
        }

        public Boolean? Checked
        {
            get => (bool?) GetValue(CheckedProperty);
            set => SetValue(CheckedProperty, value);
        }

        public String Text
        {
            get => (string) GetValue(TextProperty);
            set => SetValue(TextProperty, value);
        }

        public Checkbox()
        {
            Orientation = StackOrientation.Horizontal;
            BackgroundColor = Color.Transparent;
            _image = new Image()
                {Source = ImageSource.FromResource(imgUnchecked), HeightRequest = 35, WidthRequest = 35, VerticalOptions = LayoutOptions.Center};
            var tg = new TapGestureRecognizer();
            tg.Tapped += Tg_Tapped;
            _image.GestureRecognizers.Add(tg);
            Children.Add(_image);
            _label = new Label() {VerticalOptions = LayoutOptions.Center};
            _label.GestureRecognizers.Add(tg);
            Children.Add(_label);
        }

        private void Tg_Tapped(object sender, EventArgs e)
        {
            Checked = !Checked;
        }

        private static void CheckedValueChanged(BindableObject bindable, object oldValue, object newValue)
        {
            if (newValue != null && (Boolean) newValue) ((Checkbox) bindable)._image.Source = ImageSource.FromResource(imgChecked);
            else ((Checkbox) bindable)._image.Source = ImageSource.FromResource(imgUnchecked);
            ((Checkbox) bindable).CheckedChanged?.Invoke(bindable, EventArgs.Empty);
            ((Checkbox) bindable).Command?.Execute(null);
        }

        private static void TextValueChanged(BindableObject bindable, object oldValue, object newValue)
        {
            if (newValue != null) ((Checkbox) bindable)._label.Text = newValue.ToString();
        }
    }
}
Your are now ready to use the checkbox in your apps and it will work for every platform supported by Xamarin. GREAT!Now I’ll show you a small example on how to use this checkbox inside your App:
Add the Checkbox to your ContentPage
Inside the our ContentPage we have set the ViewModel and then added the checkbox:
<ContentPage xmlns="http://xamarin.com/schemas/2014/forms"
             xmlns:x="http://schemas.microsoft.com/winfx/2009/xaml"
             xmlns:local="clr-namespace:Tutorial02"
             xmlns:viewModel="clr-namespace:SafePhoto2.ViewModel;assembly=SafePhoto2"
             x:Class="Tutorial02.MainPage">
    <ContentPage.BindingContext>
        <viewModel:MainViewModel />
    </ContentPage.BindingContext>
    <local:Checkbox VerticalOptions="CenterAndExpand"
                    HorizontalOptions="CenterAndExpand"
                    Checked="{Binding IsChecked}"
                    Text="{Binding TextCheckBox}"
                    Command="{Binding OnCheckedChanged}">

    </local:Checkbox>
</ContentPage>
The checkbox has two important properties: Checked and Text.
- Checked is bound to the IsChecked property of the ViewModel and indicates if the checkbox is checked or not
- Text is bound to the TextCheckBox property of the ViewModel and is the text that appears next to the CheckBox image
In case you want to execute an action after the status of the checkbox is changed, you can use Command (bound to the OnCheckedChanged inside the ViewModel) otherwise you can remove it from your XAML.
Create the ViewModel
The ViewModel used in our example is very easy and you can change it as you prefer. For this simple example we have just created a basic ViewModel:
using System.ComponentModel;
using System.Runtime.CompilerServices;
using Xamarin.Forms;

namespace Tutorial02
{
    public class MainViewModel : INotifyPropertyChanged
    {
        private bool _isChecked;
        private string _textCheckBox;
        public event PropertyChangedEventHandler PropertyChanged;

        public bool IsChecked
        {
            get => _isChecked;
            set
            {
                _isChecked = value;
                TextCheckBox = _isChecked ? "Is Enabled" : "Is Disabled";
                OnPropertyChanged();
            }
        }

        public string TextCheckBox
        {
            get => _textCheckBox;
            set
            {
                _textCheckBox = value;
                OnPropertyChanged();
            }
        }

        public Command OnCheckedChanged { get; set; }

        public MainViewModel()
        {
            OnCheckedChanged = new Command(OnCheckBoxChanged);
        }

        private void OnCheckBoxChanged()
        {
        }

        protected void OnPropertyChanged([CallerMemberName] string propertyName = null)
        {
            PropertyChanged?.Invoke(this, new PropertyChangedEventArgs(propertyName));
        }
    }
}
As usual the ViewModel inherits from INotifyPropertyChanged.We have added two properties IsChecked and TextCheckBox and the Command OnCheckedChanged required only if we want to execute an action after the status of the checkbox is changed.When the IsChecked value changes, we set the Checkbox text to Is Enabled or Is Disabled according to its value.
Conclusion
In this tutorial we have seen how to create a Checkbox in Xamarin.Forms.The code is incredibly easy and ready to be used (you can copy and paste the code and it will work).If you have questions or doubts leave here a comment.If you need more info about the MVVM pattern in Xamarin you can check the Microsoft documentation here: https://docs.microsoft.com/en-us/xamarin/xamarin-forms/xaml/xaml-basics/data-bindings-to-mvvm
June 18, 2022 @ 2:43 pm
Not working