Skip to content

A QUICK GUIDE TO THE APP

Safe Money Budget
Banner

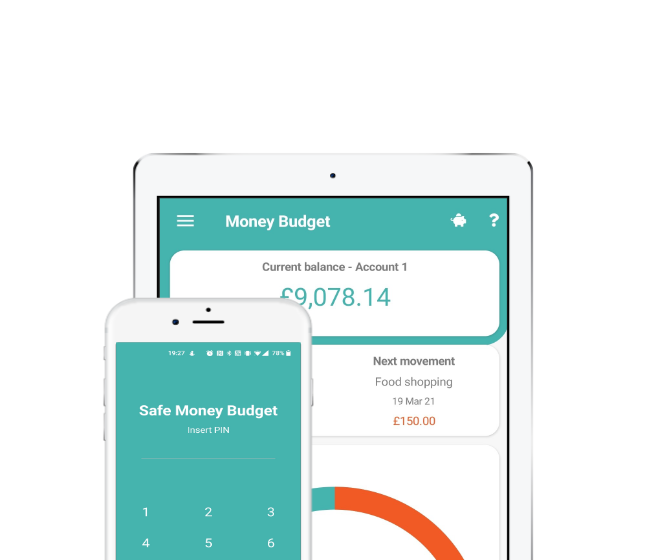
Safe Access Keep safe your financial data on your devices
help1

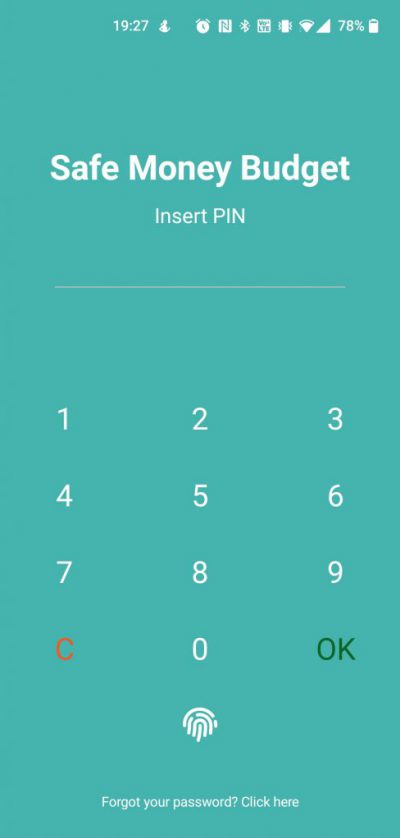
Secure Access with a PIN, Fingerprint or FceID

Protect your financial information using a PIN, Fingerprint or FaceID to quickly unlock the app.

The default PIN is 0000. You can easely change it with your preferred code.

You can also access the app with your fingerprint tapping on the Fingerprint icon.

For your security and privacy Safe Money Budget stores all your data only on your device instead of uploading your personal information on external database.

If you forgot the password, tap on “Click here”, at the bottom of the keyboard.

Choose your PIN

Simply choose your preferred numbers as yor PIN.

Restore PIN

If you forget your PIN, you can recover it using your email or a safe word. You can insert email and safe word in the Setting section. 

Home An easy overview at your accounts when you log in
help2

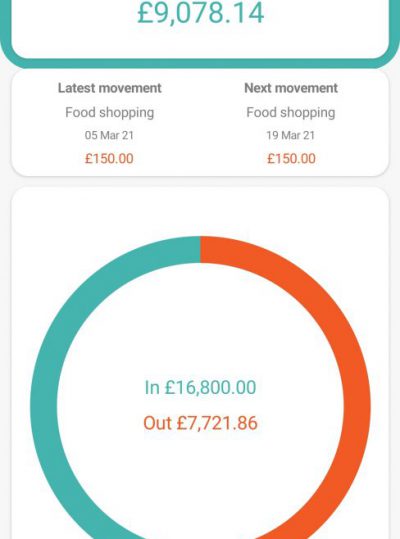
Track all your accounts in one sight

This is the starting stage to track your finance data. You can find in this section all the accounts you added. Swipe right or left on the account balance to have a quick view of each account. 

Quickly check your latest and next movement

Track your latest and next movement you added.  

Look at your overall incomes and expenses

Get a well-rounded picture of where your money goes and comes.

Add a new Movement

Tap the “Plus” icon to start to add an income or an expense.

Create a new movement The starting stage to track personal finance including Expenses & Incomes
help3

Add movements

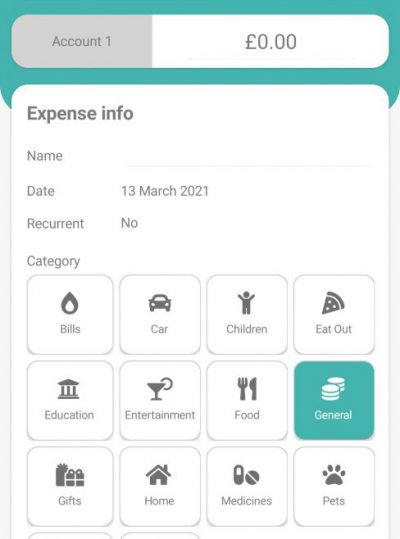
Manually enter a transaction and first select if it’s an expense or an income.

Select the account you want to add the movement to and write the amount.

By default the app will show the account you set as primary account, in the Account section. You can change it tapping on the Account name and selecting a different one.

Add the movement information. You can add the name to remember what the income or expense is about and select the date you received or spent the money. 

Easily set recurrent movements

Set how often the expense or the income will recurr, monthly / daily / every three months or more.

The app will save the date when a recurrent bills or income is coming.

Set the number of instalments

Set how many instalments you have in total or you still have to estinguish.

The app will calculate them every month/ weeks / day at your choice, for the number of instalments you have added.

Select the category

Select the category for the income or expense added.

Save your movement.

Budgeting Control your spending for each category
help4

Track your monthly budget

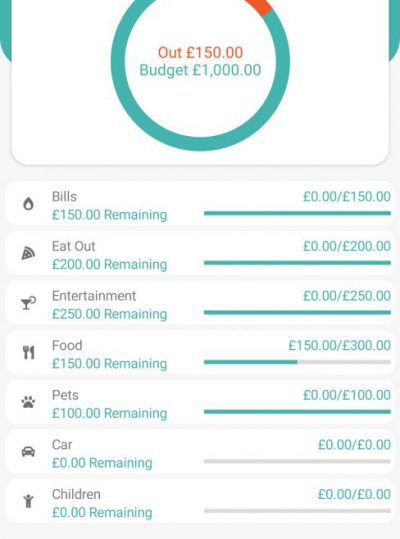
Track your spending against the budget set for all the categories while offering you a snapshot of your remaining budget to help you avoid overspending.

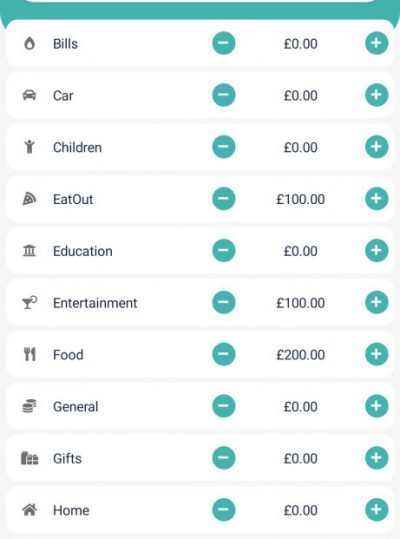
Control how much you spend for each category

View the list of categories and the budget you have allocated for each category and how it’s going with your spending.

Monthly spending trend

A quick view of your overall spending in the current month compared to other months. You can easly see if you are going over budget keeping your spending on the right track.

Edit category budget

Tap on the Pencil icon. Total is set on 0.00 by default.

Add the budget for the categories, and you will see the Total showed above increased.

Allocate the budget against the chosen category. Edit the budget for the category tapping on the amount of the category line and save.

Increase this budget by 5.00 tapping the Plus icon on the category line. Decrease this budgedt by 5.00 tapping the Minus icon on the category line. 

Movements Control your movements month by month
help7

IN & OUT

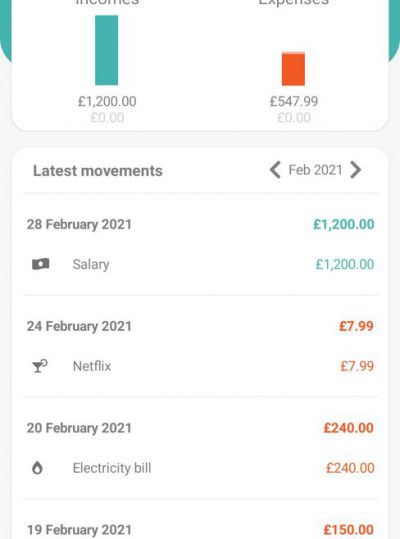
A quick look at Incomes and Expenses already made or coming in the month.

List of movements

You can get an accurate picture of where your money is going or coming every month. 

Back and forward arrows to change month and track the information for the month selected. 

Smart tools on the Movements tool bar

On the top right you have the tool bar. Search, Export, Filter movements. To know more about them read the next section. 

Smart Search

You can search the information about All your movements, only the Incomes or the Expenses by Accounts, Category, Date or a Time range.

Select the Movements you want to search.

Tap on on Account row and choose an Account. If you leave the field blank, the search will be applied on All the Accounts you have added in the app.

Tap on on Category to search the movement in that category. If you leave the field blank, the search will be applied on All the Categories you have.

Once confirmed the search, a windows with the information requested appears. 

To start a new search, expand the above section minimized, tapping on the arrow and erase the previous search for each line, tapping on the Rubber icon, on the right side of each category.

Export to Excel Quickly export your movements into an Excel file

Easy Excel Export

You can export the information about All your movements, or just Incomes or Expenses by Accounts, Category, Date or a Time range.

Select the Movements you want to export.

Tap on the From row and choose a date. If you leave this field blank, the export will be applied on All the Movements you have added in the app.

Tap on the To row and choose a date. If you leave this field blank, the search will be applied to All the Movements you have added in the app.

Once confirmed the Export, a window with the Application you want to Export your movements to will appear.

Select the Application, for example Excel. After few seconds a spreadsheet document will be generated.

You need to have an Excel-like app on your phone to see the exported file. 


Filter & Sort Movements Quicly find the information you need

Filter by & Sort by

Filter by Incomes and Expenses to see both your movements. Select Incomes to have a list only for incomes or Select Expenses to have a list for expenses only.

Sort them by Date, from the latest to the oldest, or Amount, high to low or low to high. 

When back to the Movements page, you will see the selection applied on the two IN/OUT Bar charts.

Recurring movements Keep all your recurring movements under control
help8

Recurring Incomes & Expenses List

This section is linked to the Recurring line you edit in the page Add a Movement, from the Home section.

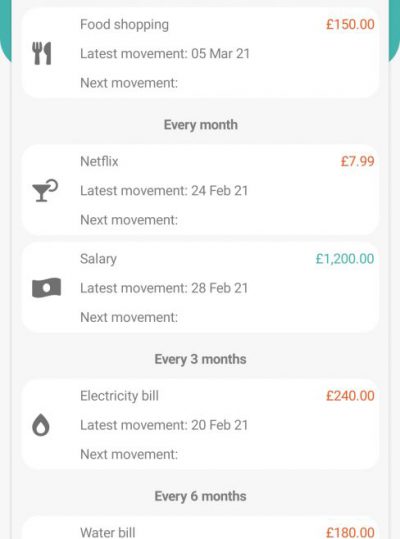
You have here the list of all your Recurring Movements divided by the period of time they will be repeated, for example Every three month, every month and so on.

For each Movement you can see the category, the name, the latest date the movement was performed, the next date you expect the same movement to arrive and the latest amount, in red if it is an expense and in green if it is an income. 

Manage the recurrent Movement

Tap on a single Movement to update the Information. Updated this section to get the most from the forecast and for you personal knowledge about your spending.

Manage the Recurrent Movement Edit, modify, pause and delete a recurring movement
help9

Quick stats on the Movement

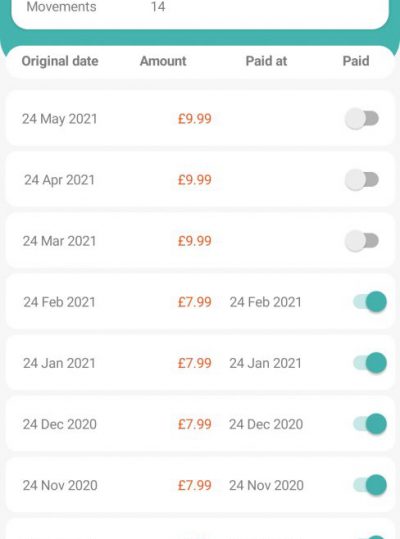
First you have the Movement name with the associate category and a quick stats about this Movement. You can see the average amount and how many movements you have made for the selected Income or Expense. 

Confirm if the Movement has been Received or Paid

You can see the latest date the Amount was Received or Paid.

The Paid switch on the right is grey when the next payment for this Movement has not been paid yet.

Once the Next Movement is done you can tick the “Paid”” switch and it will become green.

Add the date when the payment was made on the Amount you paid.

The default Amount is automatically filled. Update it if the value has changed. 

Edit the new amount tapping on the amount number and save. 

If the name of your Movement change you can modifiy the Name and Date clicking on the Recurring Movement line and save.

Smart tools on the Recurring Movements tool bar

On the top right you have the tool bar. Edit, Pause, Delete. To know more about them read the next section. 

Modify a Recurring Income / Expense

You can modify and edit the information about your recurring Movement.

Change the Amount or the Time range for this recurring Income or Expense. If you have a New Category that better describe this movement you can select the Category and save.

Stop or Resume a Recurring Income / Expense

If you need to stop a Recurring Income or Expense, just tap on the Stop icon.

Delete a Recurring Income / Expense

Confirm if you want to cancel this Recurring Movement and all the associated information. 

Graphs A quick and visual way to control your finance
help10

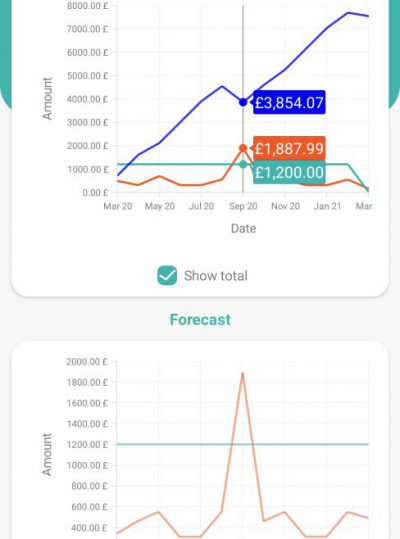
Movements Graph

The graph tracks your actual spending and incomes in a month. 

Tick “Show Total” to see the difference between incomes and expenses.

Forecast Graph

You can see here your Incomes and Expenses calculated automatically from your recurring movements up to 12 months.

Smart tools on the Movements & Forecast Graphs

On the top right you have the tool bar with a Filter to see the Movements and Forecast throughout the selected option: 3 months, 6 months or 1 year. The selection will apperars on the graphs.

Calendar View & Shortcut Edit on actual Movements & Forecast
help11

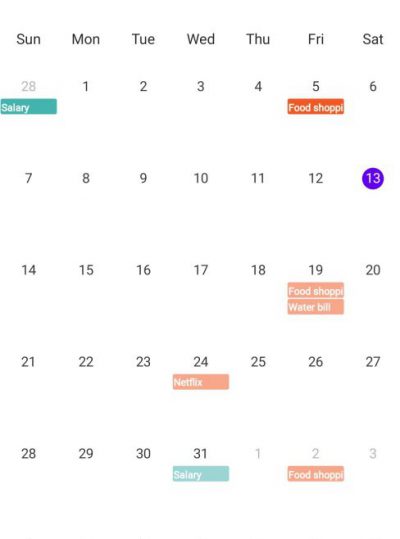
Monthly Calendar

View your Incomes and Expense on the calendar.

Expand Day Information

Tap on a specific date of the calendar to expand the information of that day.

You can see past and future Movements.

Movements Edit Shortcut

You can edit a Movement from the Calendar.

Tap on the Income or the Expense that appears in a bold color line and update the information if needed.

Tap on the Recurring Income or the Expense that appears in a lighter color line and confirm if you have made the payment or received it.

Once confirmed, you can edit the information and save it.

SIde bar More tools swiping from the left

Accounts Create and edit your accounts
help12

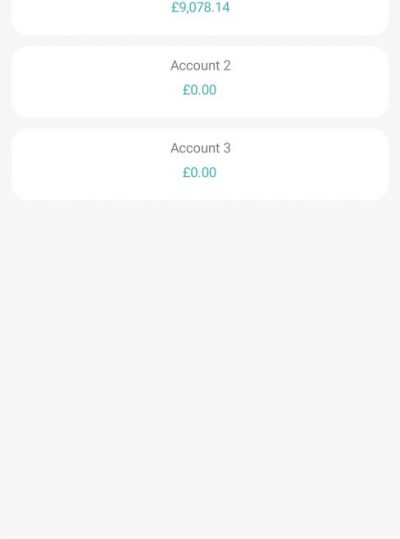
Add new Accounts

Add the name of the Accounts linked to your incomes and expenses. An account can be a debit cards, a credit card, different bank accounts, savings, and more.

The app is not connected to your financial accounts and for your safatey does not track your transactions automatically.

Edit your accounts

Name: Add a name for your Accounts.

Note: Add a note referred to the account if needed.

Starting balance: Add the amount you have on your account. The app will count new movements starting from there.

Primary Account: Tick “Primary Account” if you want to set this account as the default account. It will be the first to be shown in the home page and the default Account into the “New Movement” page. 

Remove accounts

Select the account you need to remove. The Account Information page will open. Tap on the bin icon on the top right of the bar to delete the account. 

Removing the Account will remove all the Movements associated to it.

If you have just one account and you perform this action on this account, the app will not delete it.


Categories Manage your categories

Budget

Default Categories

You can see a list of default categories, within general Bills, Salary, Eat Out, Pets, Travel and more. 

These categories are available by default also in the Movements section and Budget section.

Create a new Category

You can set up your custom categories from the list of Categories, Just tap on the Plus icon and add the Name for your new category.

Tick “Available on Budget” if you want this category also available in the Budget Section.

Select one of the Icons you would like to associate to this new category and save it.

Customized categories are available in the Movements section and Budget section.

Import from Excel Quickly import your movements from an excel file

Import spreadsheets

To import an Excel file, tap on the button Select a file and Confirm that you want to import data from an Excel file to the app, then tap on yes. 

Your device will shows you the folders where you can find the Excel file from your device and import it in the app.

Backup Easily create or import a backup of your data
help14

Import a Backup

Import a backup of your data tapping on the buttom Import Backup. The app will ask you if you want to Import a backup file from your device, then tap Yes.

Your device will show you the folders where you can find the Excel file from your device and import it in the app.

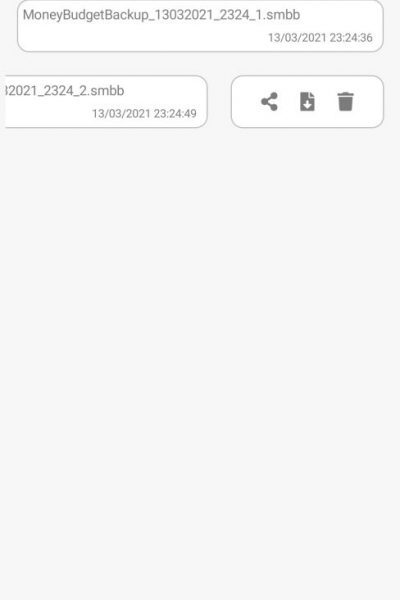
You will see the imported file listed in this section of the app.

Create a backup file

Create a backup file with the information you have in the app, tapping on Create a Backup.

A window will appear asking what Movements you want to backup in a specific time frame. Tap on the From and To lines to select Day | Month | Year and then tap Ok. If the dates are not selected, the backup will be created for all the Movements.

Toolbar on the Backup

Swipe from the right to the left the imported Backup row listed in the homepage of this section. A toolbar will appear with three icons: Share, Export, Delete. To know more about them read the next section.

Toolbar on the Backup Share. Export. Delete.

Share a backup from the list

Tap on the Share icon to share your Backup with other applications or other contacts. Just select one application, the contact and share. The app will ask you to confirm this action.

Restore a backup file into the app

Tap on the Restore icon to bring back in the app the information created in the Backup. The app will inform you about how many movements or recurring movements in the forecast have been restored.

Delete a Backup from the app

Tap to delete a backup from the list. Confirm with Yes your choice.

Settings Manage the security of your app 

PIN settings

Protect your app with a PIN.

Enable Fingerprint / Face ID.

Auto login on correct PIN.

Ask Fingerprint on app start.

Recovery Email

Tap on Insert Email to insert your email and save it. This email is only saved on your phone.

The email will be used to send you a PIN in case you lose it. The app doesn’t save your data, so the password will be directly sent from the app.

Safe word

Tap on Insert safe word to write your word. In case you forget your PIN, you can recover it using the Safe word inserted here.

Dark Mode

Click on the swich to select the Dark Mode. The app backgroung will become dark blue.

To de-select the Dark mode, just go on Settings – Dark Mode and tap on the right slide. Automatically the app backgroung will become white.

Font Size

Select the font size as you prefer. Just slide it.

Safe Money Budget | High Touch Innovation© 2021